Beauty and Fashion blog by Rebekah O'Leary

Thursday 25 August 2016

My Ride or Die makeup products | Jaclyn Hill Tag - favourite products of all time!


Hello my loves,

The other night I was in bed watching Jaclyn Hill's newest YouTube video (If you don't know you Jaclyn Hill is I'll link her channel >> here !) and basically the video was all about her Ride or Die makeup products. I was so inspired when I watched it, I was like "OH MY GOOODDD I have to do a post on this tag"!
So I gave myself a week to properly think long and hard about my Ride or Die products - so basically makeup products that I could not live without; say if they discontinued them, I'd probably die or If I was going away on holidays I would definitely bring with me because I know that I can always rely on these products to be bomb.com, products I've repurchased a few times!
 I love makeup and I'm always trying out new products because I am a makeup junkie and I enjoy finding and testing new things - but even have my trusty reliable's that I return to and repurchase again and again.

After much deliberating, here are my Ride or Die makeup products:
(I'll try to chronological like face, eyes etc.)


This will be a long post, so get yourself some tea and snacks!<3

Primer:


Now that is one LONG name - I just refer to this as my L'Oreal skin perfecter haha! This primer will smooth out any lines or pore that you have and give you a totally seamless and matte base. I use it on my t-zone area, chin and anywhere I have lines that need filling!
I wear this sometimes even on no makeup days to smooth out pores and my skin looks beyond flawless. Every time I forget to use this before my makeup I see a huge difference, I feel my makeup sits better and lasts long with this product. Plus it has added skincare benefits so it's an all round winner in my book!

Foundation:


This was a hard on to pick, I'm not going to lie. But when I laid it out and thought about it, I kept coming back to this baby. This makeup has been created to make you look flawless on 4K television so if it can do that, it can sure as hell make you look amazing in your normal life and it does just that.
I always get compliments on my makeup when I wear this. It gives a gorgeous satin finish to the skin and it has bulidable coverage so can take you from day to night - which I adore. A little bit goes a long way too. I also adore their shade selection; there is a shade for everyone. Makeup forever work with undertones so you will get the foundation colour AND undertone colour that will match your skin perfect - it has never been so easy to find your perfect match.

Concealer:


This was an easy one for me because I have gone through 3 bottles of this! I always struggle with finding good concealers because I have dry under eyes and everything basically creases for me - but not this concealer! It gives amazing coverage, enough to hide my serious eye darkness and veins - but it does not look heavy or cakey in the slightest - it just looks airbrushed. I also have an issue that a lot of chemist/drugstore concealer have pink undertones and that is just a massive no for my yellow - olive skin tone, so I really appreciate that they have a 'warm' shade selection in their concealers for use yellow skin tones!
My favourite tip is to blend my concealers out with a damp sponge for a flawless finish.

Setting Powder:


I was introduced to this by a gorgeous makeup artist (@merrydollx is her insta handle) when she did my makeup before and since that day I have never looked back. This is my holy grail powder, it is the only powder that doesn't cake on me and make me look like a mucky mess. If you have dry skin you will love this powder. I have other more expensive powders and they all just go creepy and disgusting under my eyes after an hour or cause my foundation to separate, this one never does that.

Blush:


I feel like this is so clique but I don't care because this is my favourite blush by a mile. It's actually one of the only blushes I ever wear. It is the most stunning peachy pink with a gorgeous gold shimmer in it that just helps it melt into your skin and give you a really healthy glow, a glow that doesn't look clown pink or orange. I have seen brands do dupes of this blush but they don't seem to get the gold glitter part right, the dupes of this always end up going patchy or the glitter doesn't melt in naturally with the skin. This is a great every day blush and I feel it suits most skin tones. If you only ever buy one blush - this is my suggestion!

Bronzer:
Too faced chocolate Soleil bronzer


This was another easy one because this is the only bronzer that I have ever trued that has actually worked out for me. Until I purchased this bronzer, every single other one I tried either was way to orange or just went mucky on my skin; by the end of some days I would look like I'd fallen into muck, it really turned me off bronzers for a while to be honest. This bronzer however is everything that all those other bronzers are not - it smells like chocolate firstly, it's a gorgeous true toned brown - not a scrap of orange in sight and it blends out like a dream because the powder is so finely milled - I have NEVER gotten the mucky look form this bronzer. this bronzer also works great as a contour shade if you're in the market for a contour shade.

Highlight:


Another Holy grail for many people but that's because its so god damn good! It's a gorgeous peachy champagne shade and it is just so pigmented. It gives you a gorgeous glow without giving you chunks of glitter all over your face which is a massive winner in my books. It's also a natural enough shade for light to medium skin tones for it to actually look somewhat realistic (you can obviously amp this up at night by adding an extra layer). You could definitely be a happy woman with just this as your only highlighter - it is 100% my most used highlighter!

Brows:
Anastasia Beverly Hills Dipbrow Pomade (my shade is ebony)

I'm going to be honest, before Anastasia's Dipbrow came into my life, my brows were nothing special - I would actually describe them as disgraceful! Because I have such dark hair I always struggled to get a brown that was dark enough but didn't have red undertones. My eyebrows are just slightly off black but there is zero warmth to them so a warm brown eye brow pencil basically looked like I'd gone at mine with an eyeliner. It just looked awful! So after searching for ages I heard about this dipbrow and over 2 years later I have not looked back once. I use this every day I do my makeup in conjunction with Anastasia's duo ended brow brush #12 and that combination is what I owe my good brows to. This product is a holy grail status for me.

Mascara:


This one was another easy one. I have never had a mascara do to my lashes what this mascara does. I know lots of mascaras claim to be false lash effect (and I sometimes wonder what false lashes these marketing people wear to be honest..) but this mascara actually makes you look like you have fake lashes on. I have had people numerous of times ask me am I wearing false lashes when I have this on. It thickens and lengthens while also separating (the latter to a lesser extent). The best way I can describe this mascara is like a push bra for your eyelashes - one of the extremely push up ones! I would be happy to leave the lashes and wear this on a night out, and that is a bold claim!

Eyeshadow palette:

This was a tough category as I am a living breathing eyeshadow junkie. I am firmly under the impression that you can never have enough eyeshadow palettes and that no two brown shades are the same - I have fought with my own mother over that statement many a time!
This is a palette that will honestly suit everyone from a skin tone and eye colour point of view and will also suit both makeup artist and beginners - it's just universal. That is why it's my ride or die - you can create day looks and night looks entirely from this palette without having to dip into other palettes. This is a perfect palette to bring on holidays or weekends away as it will be all you need! The shadows blend like a dream and there is a nice variety of both matte and shimmer; also, it smells (and tastes - don't ask haha) like cocoa powder!

Eyeliner:

This is the blackest of the black eyeliners I have ever tried. It glides on smooth and lasts until I want to take it off - and honestly even after that sometimes it's that long lasting! It never smudges. This is what I will use to create my winged liner and I also use this in my waterline. I always use gel liner in my waterline as kohl pencils tend to just cry out of my eyes. This is makeup bag essential. 

Lipliner:
Huda Beauty lip contours ('Bombshell' is my ride or die!)

Pic source - www.allure.com

I thought I loved Mac lip liners with no competition, UNTIL, I picked up one of Huda's Lip contours and my god I was like 'eh Mac WHO??'. These pencils are 1 million times creamier and long lasting, with no dry crackly feeling - there is no comparison, these are the best lip liners I have ever used. Bombshell is my favourite shade and it is the perfect peachy shade. I wear it with most nude lipsticks but also by itself too. It's my go to every day colour. I promise you, you need these lip pencils in your life, they are worth every cent.

Liquid lipstick:
Lime Crime Velvetines Matte Liquid lipstick ('Bleached' is my Ride or Die)

Okay, this was up there with how hard I found to pick an eyeshadow palette - possibly even harder. I picked bleached by Lime Crime for a few reasons - Lime Crime debatably makes one of the best, if not THE best liquid lip formula. Their colours are not drying and they are totally pigmented, the colour selection is also beyond amazing; from nudes, to red, to gold, they have it all. Bleached is the most gorgeous peachy nude, perfect for everyday but also amazing with a smokey eye at night. I love to pair this with the Bombshell Huda Beauty liner. I could safely say I would be happy to wear this combo every day.


Phewwwww, see I told you all that would be a long one!
I hope you all enjoyed my Ride or Die round up - it was a big challenge for a makeup junkie like me!
I want to know what YOUR ride or die makeup products are! Once you've finished reading leave me some of your products in the comment section - I love reading people's all time, all star products!

With Love from,

Rebekah x


SHARE:

Thursday 18 August 2016

Morphe 35U eyeshadow palette review & swatches


Hello my loves,

I promised myself I would be really good this month & post as much as possible on my blog - so far I think I have been doing quite well and I plan on keeping this up<3

Today's post is all about my new Morphe 35U palette! 


Direct palette link: here


So I think we all know by now I'm a pretty neutral makeup person; I'm not usually one for the wild colors. That being said, I really want to incorporate more color into my look - spice it up at little! I'm always envious of the Instagram girls, or actually even all the beautiful Inglot makeup artists that I follow that rock color on their eyes so amazingly!
I felt that something my makeup collection was really lacking was a colored eyeshadow palette. I think everyone should have at least one coloured eyeshadow palette in their stash if they love makeup, even if you don't want to create crazy looks, colored shadows are amazing for adding accents of colour for a pop. If you are a makeup artist I would nearly call this palette a kit essential.

This was my first ever Morphe palette and Morphe was actually the first brand I thought of when I was scouting for a colour palette - as I'm not a huge color wearer I didn't want to fork out a bomb on. I've always heard rave reviews about their palettes but for the price point (I got my palette for €21 from Beautybay.com) I did struggle to believe that it would be as good as the hype I had read. I've purchased multi shade bargain palettes when I was younger and just getting in to makeup and I was never very impressed with the quality.

With this Morphe 35U palette however I most certainly not left disappointed.
At €21 (this will vary depending on exchange rates) for the palette each shade works out at roughly 0.60 cent - I KNOW RIGHT?!! For that price you are getting very generous sized pans which is very impressive.
That's a bargain I can't even believe I'm typing especially since it rivals products I have spent over double on. It is a 100% shimmer & satin palette - you can buy a total matte one but look, I love me some shimmer and I knew for pops of color I would prefer shimmer.

The swatches below are one swipe on dry skin:


 I couldn't even believe the pigmentation I was getting out of one swipe and when I took the pictures I was just so impressed. Each shadow is buttery - some were slightly more powdery than others but absolutely nothing that a primer wouldn't sort, and they all blend out like a dream. I really expected this to just be a slight up on drugstore shadows but I was absolutely wrong, this is comparable with both Anastasia Beverly Hills and Makeup Geek.

You get a fantastic color selection in this palette, you basically get the rainbow and then some! Even if you aren't a huge color fan, there is plenty in here to keep the neutral lovin' gal/guy happy - the browns, bronzes and blacks are gorgeous.
 My only tiny criticism is that a few shades were quite similar (I cannot tell the difference between any of the black shades to be honest) when swatched but honestly that doesn't phase me considering the price.

If you need a color shadow palette in your life (this palette would also be amazing for Halloween coming up, I'm planning on using this for a Harley Quinn look) or you are just sick of the basic neutral palettes and want something to get those creative juices following, I high recommend this palette. It is worth every penny and more.

As mentioned above I got this palette from beautybay.com - which is perfect for Ireland, UK, European and international customers but if you live in the USA you can order directly from morphe.com

Have any of you tried any of Morphe's other palettes? Let me know below what ones and what your thoughts are!

With Love from,

Rebekah x

SHARE:

Tuesday 16 August 2016

PrettyLittleThing: 'Eastern Promise' drop

Hello my loves,

Have you ever seen clothes and just felt inspired for no real apparent reason?
When I saw PrettyLittleThing.com's newest drop, I felt this way! I Usually don't really do specific posts for brand drops, but this collection hit my heart hard!


PrettyLittleThing are describing their Eastern Promise collection as a trans season drop - trans seasons are my FAVOURITE, basically it's late summer, early autumn & late spring early summer.
The colour palette is to die for, literally to die for. There are neutral stone nude shades, mixed with arrays of pink from light pink to rose, some dusty blue and of course some darker trans-seasonal colours & oriental-esque print. The mix of fabric is also so varied - you''ll see some lace, some satin, velvet & even fluffy material. 
The collection very really has my name written all over it.

The majority of pieces in this collection are under €30, with the exception of the jackets & fancier dresses, so good price points!

I've picked out some of my favourite pieces from the collection and I am going to link them below for you all to lust over and shop away to your heart's content:


So there we have it, a round up of my favourite pieces from this collection - I've nearly named them all!
Let me know if you guys like these types of posts!

What pieces are your favourites from the drop?

With Love from,

Rebekah x


(All pictures sources are from prettylittlething.com)


SHARE:

Friday 12 August 2016

Beauty Blender VS Real Techniques Miracle Complexion Sponge

Hello my loves,

Today I'm going to do a little comparison post between the Beauty Blender and the Real Techniques Miracle Complexion Sponge (that is a MOUTHFUL!). Before I begin, for those who do not know both these products are sponges you use to apply makeup to your face. A sponge is my favourite way to blend the foundation into my skin. I will apply my makeup roughly with a brush to place where I want it and then I will use my sponge to blend it out over my skin. This ensures there are no brush stroke marks and the finish is totally even. The sponges also help to absorb any excess makeup from your face so you avoid the dreaded cakey face.

(For the purpose of the post I will be referring to the Real Techniques Miracle Complexion as the Real Techniques sponge.)


The Real Techniques sponge is the Orange sponge and that is the only colour you can buy it in. You can pick one of these up from most Boots and Superdrug Chemists and online. I actually have seen this particular sponge in most chemists & pharmacies I have been in. It retails for roughly €7.99.
The shape of this sponge is basically egg shaped, with a piece removed - what I'm trying to say is that the base of the sponge has a flat edge also.

Beauty Blender

This is the pink sponge. You can actually buy this in a variety of shades - red, nude, black etc. and you can get these from Boots.co.uk (I haven't seen this in any in-store Boots or chemists), Beauty Bay, Cult Beauty, Sephora and the Beauty Blender website. They retail from roughly €20.
This is sponge is just totally egg shaped, it has no edges.

Similarities

  • Both sponges need to be used damp. Never use either dry - they will totally absorb all your product (bye to your expensive foundation!). Run both of these under the tap until they swell & fill with water and then squeeze out all the water to give yourself a damp sponge.
  • Both need to be used in a patting motion when applying your makeup. you don't drag these across your skin, you bounce them over your skin to blend your makeup in seamlessly.
  • Both can be used to blend other products such as contour, blush etc into your skin.

Differences
  • Once dampened, the Real Techniques sponge swells considerably bigger than the Beauty Blender - this can be good in the sense you cover more space when blending, but it can make it hard getting into awkward areas like around your eyes.
  • The Real Techniques sponge tends to absorb more product than the Beauty Blender - you can tell that this is the case right from when you are dampening them, it is harder to get the water completely out. You will also notice when you are cleaning your sponges, it is very hard to remove all the products stains from the Real Techniques sponge.
  • While they both look like they are made out of the same material(?), there is actually a difference in texture between them. My current Real Techniques sponge is not as bouncy and solid as my Beauty Blender. This is very hard to explain without showing it physically but when you squeeze your Real Techniques sponge hard while it is damp you will see you can leave finger print indentations but this won't happen with your Beauty Blender. I notice that this particular material doesn't allow for as seamless a blend on your makeup in comparison to the Beauty Blender.
  • The flat side of the Real Techniques sponge is actually a very handy addition to the sponge - it makes it easier to blend contour under your cheekbones or your nose contour. The flat side of this sponge is very handy for applying the 'baking' technique under your eyes or under your contour.

Conclusion

So out of the sponges which would I choose? 
If I had a choice, money no object, I would pick and recommend the Beauty Blender based on the points above. I feel like the overall application and finish it gives to your makeup is second to none. HOWEVER, considering the price of the Beauty Blender; I would expect it to do all this indefinitely. 
For the price that it is, I feel the Real Techniques sponge is very good competition. Yes, I do find it can take longer to get the same effect as the Beauty Blender, but it is possible to achieve a very similar result - considering it is even less than 1/2 the price of the Beauty Blender I think it is a very good addition to anybodies makeup bag - it beats out any other of the cheaper brand sponges I have used by a mile!

I hope you all found this helpful!
Any questions, leave them below <3

With Love from,

Rebekah x 


SHARE:

Monday 8 August 2016

Colour Correcting 101

Hello my loves,

This post has been promised for a while so I am so sorry I haven't gotten around to getting this up sooner! A lot of you were really interested in the topic when I posted about it a month or two ago so I am here now to bring you what you all wanted! This post is going to be an in depth 101 on the concept of colour correcting that you can refer to whenever you need help colour correcting.


Before we begin we are going to need to go all the way back to school. 
To understand colour correcting properly you need to understand the colour wheel which you would be familiar with if you studied art...

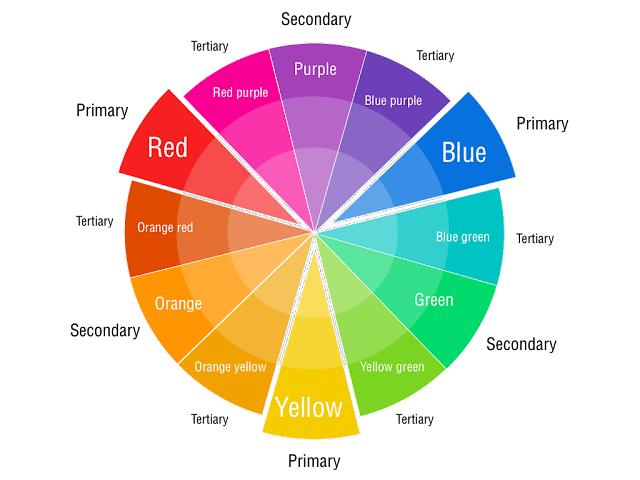
Credit: http://blog.canvascorpbrands.com/tattered-tangles-color-me-cards-book-tags/

In Colour wheel theory; complementary colours are colours that lie directly across from each other on the colour wheel e.g. Red & green or Yellow & Purple.
Typically speaking in complementary colour theories, once you combine two complementary colours you will get a grey scale (neutral) colour.
This exactly what you will use colour correcting for.
You want to identify your problem area e.g. redness on your cheeks and pick the shade (in this case it is green) that will neutralize it. 
The aim of colour correcting is to give you a neutral base that is even in pigmentation or colour.

So I think I have shoved enough theory down all your throat for one post! I just think that it is good to know the background of what you doing, if you understand something I feel like it is then easier to comprehend and put into practice, especially if you see it from a practical point of view.

Different products are used for colour correcting. There are concealers, primers, powders, cc creams but they all work to correct colour issues. Concealer is the one that is going to give you the best coverage and will allow you to target a few different colour issues through using a few different concealer shades whilst primer or CC creams are good for targeting one widespread colour issue like rosacea.

Next I am going to talk you through what specific concealer colour is best for each issue, please reference the colour wheel above to visually understand and see for yourself what I am talking about if you get confused!

Green
Counteracts/Neutralizes: Redness
Ideal for: Rosacea, scars & blemishes
Green concealer is perfect for covering angry red blemishes or healing spot scars. If Rosacea is your issue I would recommend using a green primer and then applying some green concealer where you notice it is still quite red.


Orange/Peach/Salmon
Counteracts/Neutralizes: Blueness
Ideal for: Dark under eye circles, bruises or veins. Also gives olive skin tones radiance.
Orange concealer is great for hiding under eye darkness and visible veins. As a guide lighter skin tones should use a lighter peach or salmon shade as it will be easier to blend out and medium to dark skin tones require the pigment of a true orange shade to cover their darkness concerns.


Yellow
Counteracts/Neutralizes: Purple 
Ideal for: Any area that needs brightness & radiance also can help dark under eye circles.
Yellow is a great all over corrector to give your s.kin some life back into it - that's why it is usually included in highlighting and contouring palettes as your highlighter and brightening shade. Light skin tones will find a yellow can help to reduce and brighten under eye darkness.


Purple
Counteracts/Neutralizes: Yellow
Ideal for: Pasty, dull or sallow complexions
This is a hard one to identify for most people. If you have sallow skin you will notice that even if you are pale skinned you have a yellow under colour shining through. Asian skin tones can have a strong yellow undertone. Purple is also used to add life to your skin also and will counteract any dullness in your skin.


Pink
Counteracts/Neutralizes: Dull skin
Ideal for: Anyone who wants to add radiance and brightness particularly fairer complexions. Covers age & sun spots on fair skin tones.
Pink or rose shades are perfect for adding brightness to fair skin tones especially those who find the yellow is too obvious. They help to counteract dullness around the nose and mouth  and to give a brightness back to your skin. Pink can also cover light dark circles under your eyes, but it will not cover as well as a peach or orange concealer.


Blue
Counteracts/Neutralizes: Orange
Ideal for: Covering freckles & hyper-pigmentation
Have you ever done your face fake tan and it looks a little more orange than you anticipated? A blue concealer or primer can tone down that orange. If you have freckles or sun spots that bother you blue concealer will also help cover these.

Red
Counteracts/Neutralizes: Green
Ideal for: Covering tattoos, fading green bruises & dark under eyes with a strong green tone on medium, dark or deep skin tones.
Red concealer is amazing for covering tattoos as there is a strong green tone going through tattoos, particularly noticeable as they age and fade. 


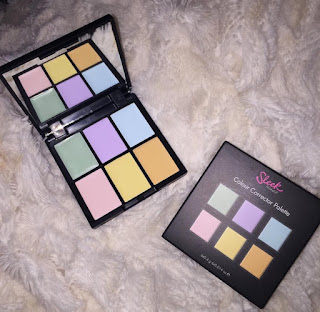
Above in my recommended products in each section I have mentioned the Sleek Colour Corrector a few times - this is because kits are my favourite all round colour correcting products. I like that they give me most of the colours, it's handy to have them all together! I feel everyone should have a colour correcting kit in their makeup bag.


The single products are good if you have a specific issue that needs correction. So in my case I always have a peach tone concealer pot on hand to cover my dark circles!

What step do I incorporate colour correcting concealer?

In terms of colour correcting concealer I always apply them AFTER my primer and BEFORE my foundation. 


Once I have lay down the colour correction shades I blend them in lightly with a beauty blender sponge and then apply my foundation over the top. I cover all my usual areas with my normal skin tone concealer then. It sounds like a lot of makeup but if you blend each step out with a beauty blender you DO NOT feel or look like you are wearing a lot of makeup, I promise.

There you have it - that is my concealer 101 lesson!
If I left anything out or you have some unanswered questions, please leave me a comment below and I will of course get back to!

With Love from,

Rebekah x


SHARE:
© Rebekah with Love

This site uses cookies from Google to deliver its services - Click here for information.

Blogger Template Created by pipdig