Beauty and Fashion blog by Rebekah O'Leary

Monday 13 March 2017

Crown Brush 35 Colour Rose Gold Palette | Review & Swatches

Hi my Loves,

I wanted to review & swatch the Crown Brush 35 colour Rose Gold eyeshadow palette for you all today. This palette was bought for me by my mam as a Christmas present and since then it has been one of my most reached for and most used palette.
Every time I have mentioned or used this palette I have gotten LOADS of questions about the palette and you guys have asked me if it is similar to Morphe palettes because honestly they do look similar.

First off, here is what the Crown Brushes Rose Gold palette looks like - she is a beauty isn't she! This was purchased straight from crownbrushes.ie and cost €29

35 Rose Gold Palette

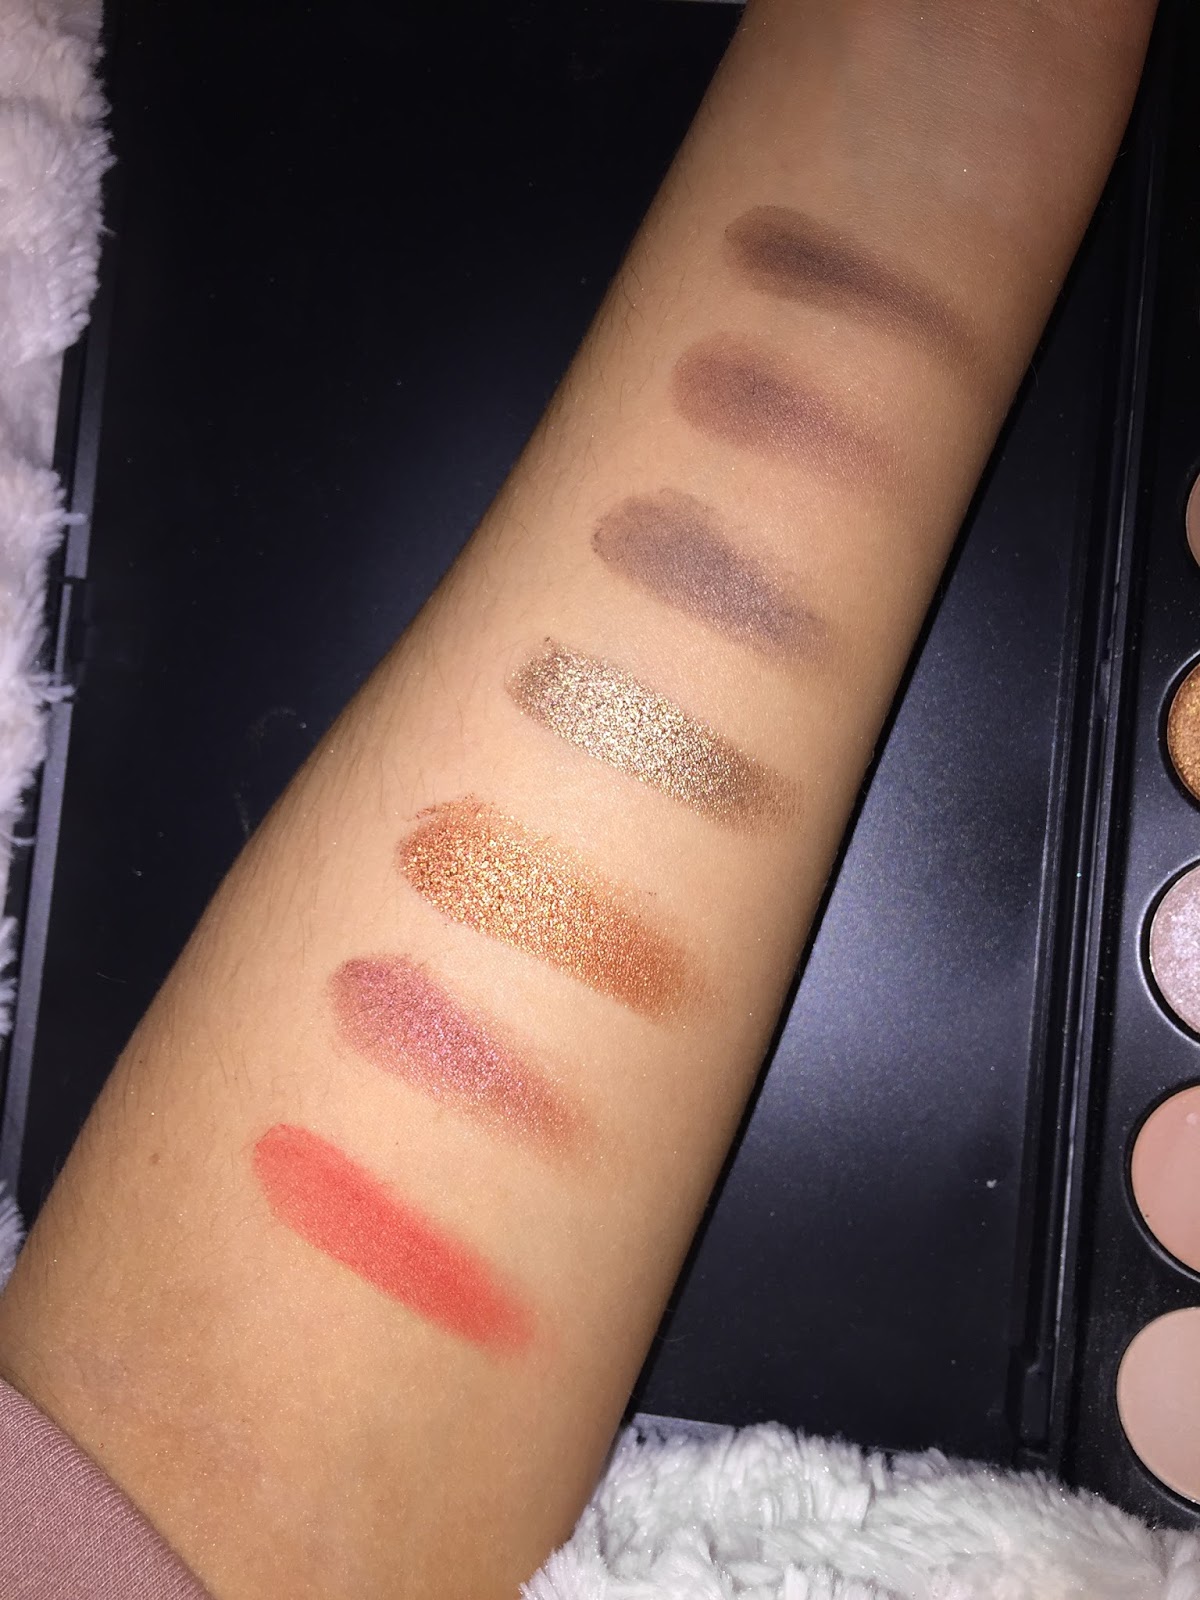
As a huge Rose Gold lover- it's my favourite colour for jewellery - the name alone had me at hello, but the colour selection sealed the deal. I could create a dream palette this would be it - the colours are exactly what I look for. Warm browns, some peach, rich gold & bronze shimmers, pops of reds - I adore this spectrum of colours. 
At €29 each shadow in this palette works out at 83 cent - WHICH IS A STEAL!

Formula wise I am absolutely impressed with this palette. The shimmer shades are so buttery & pigmented. Two issues brands struggle with when making shadows is that the shimmery shadows have a lot of fall out and the matte shades are not pigmented enough and are scratchy. Whilst I do like the matte shades, one or two of them especially in the lighter shades were hard to build pigment on - but every shimmer shade was consistent.
You also get a great selection of colours in this  palette and there is a good balance of both matte and shimmers allowing you to create multiple looks just using one palette.

top row (horizontal)

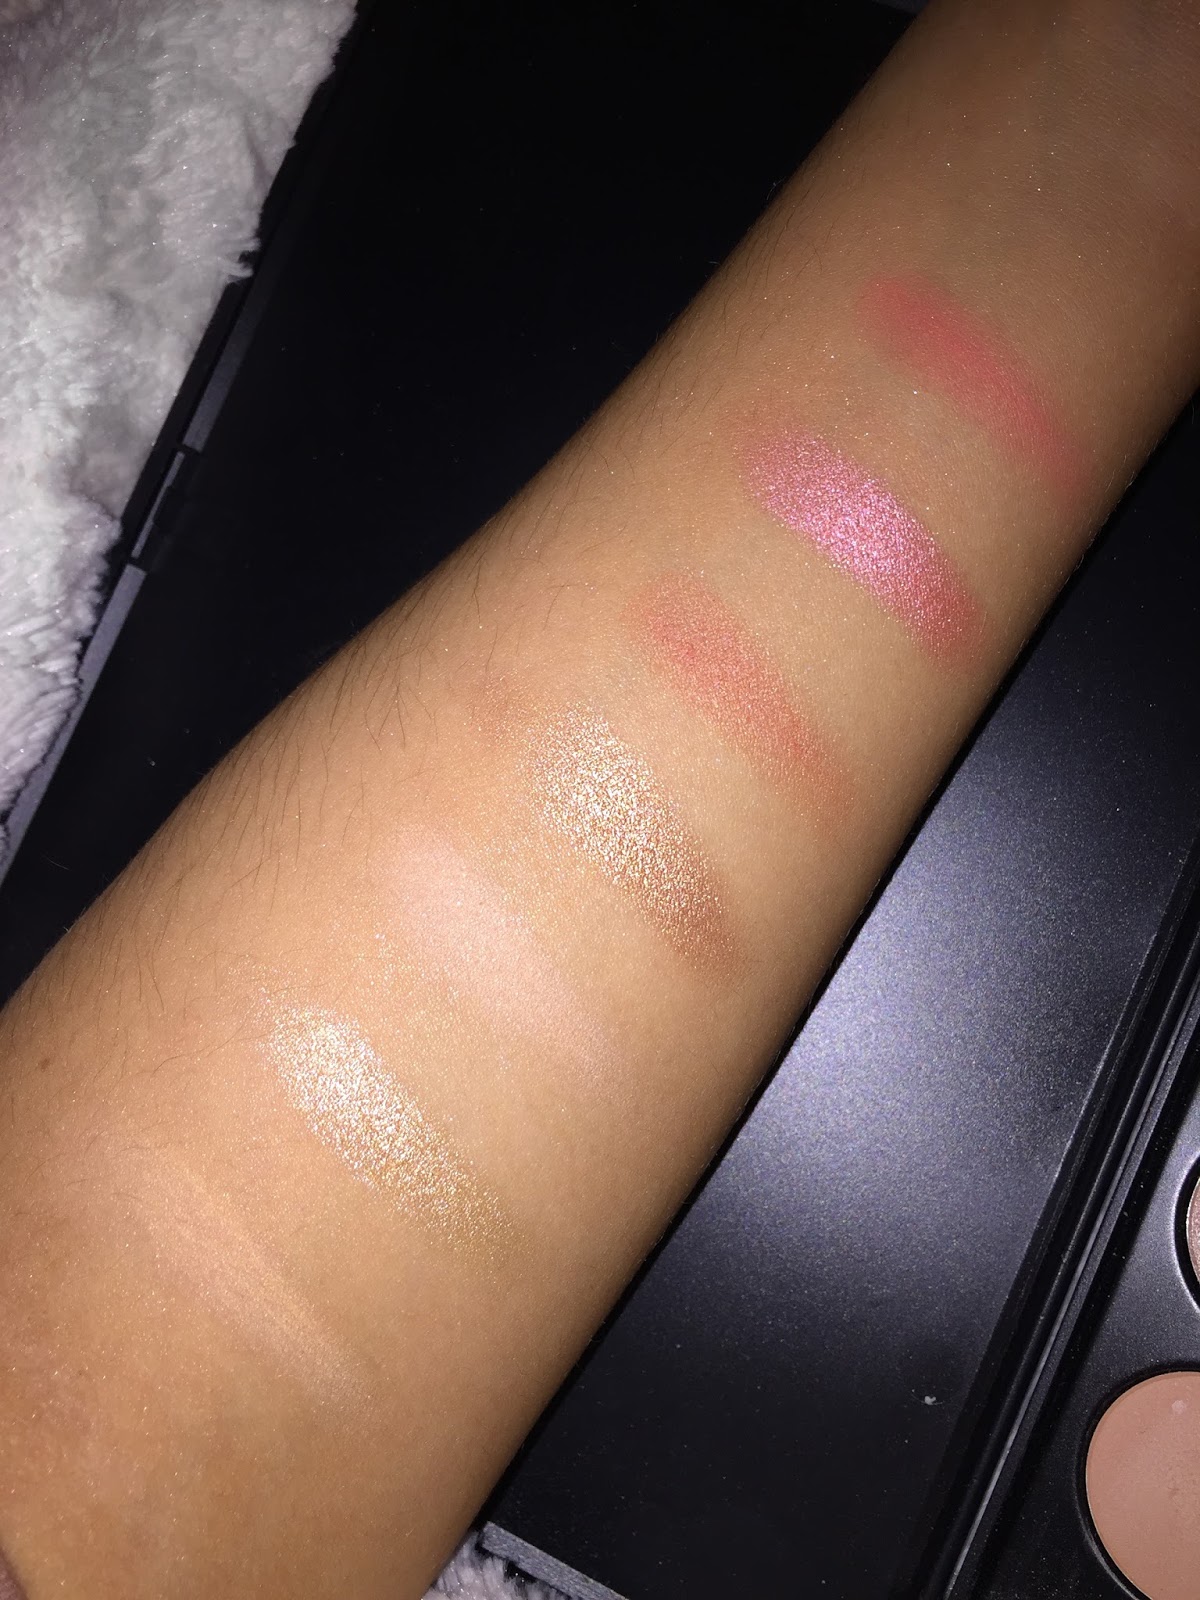
Second row from the top

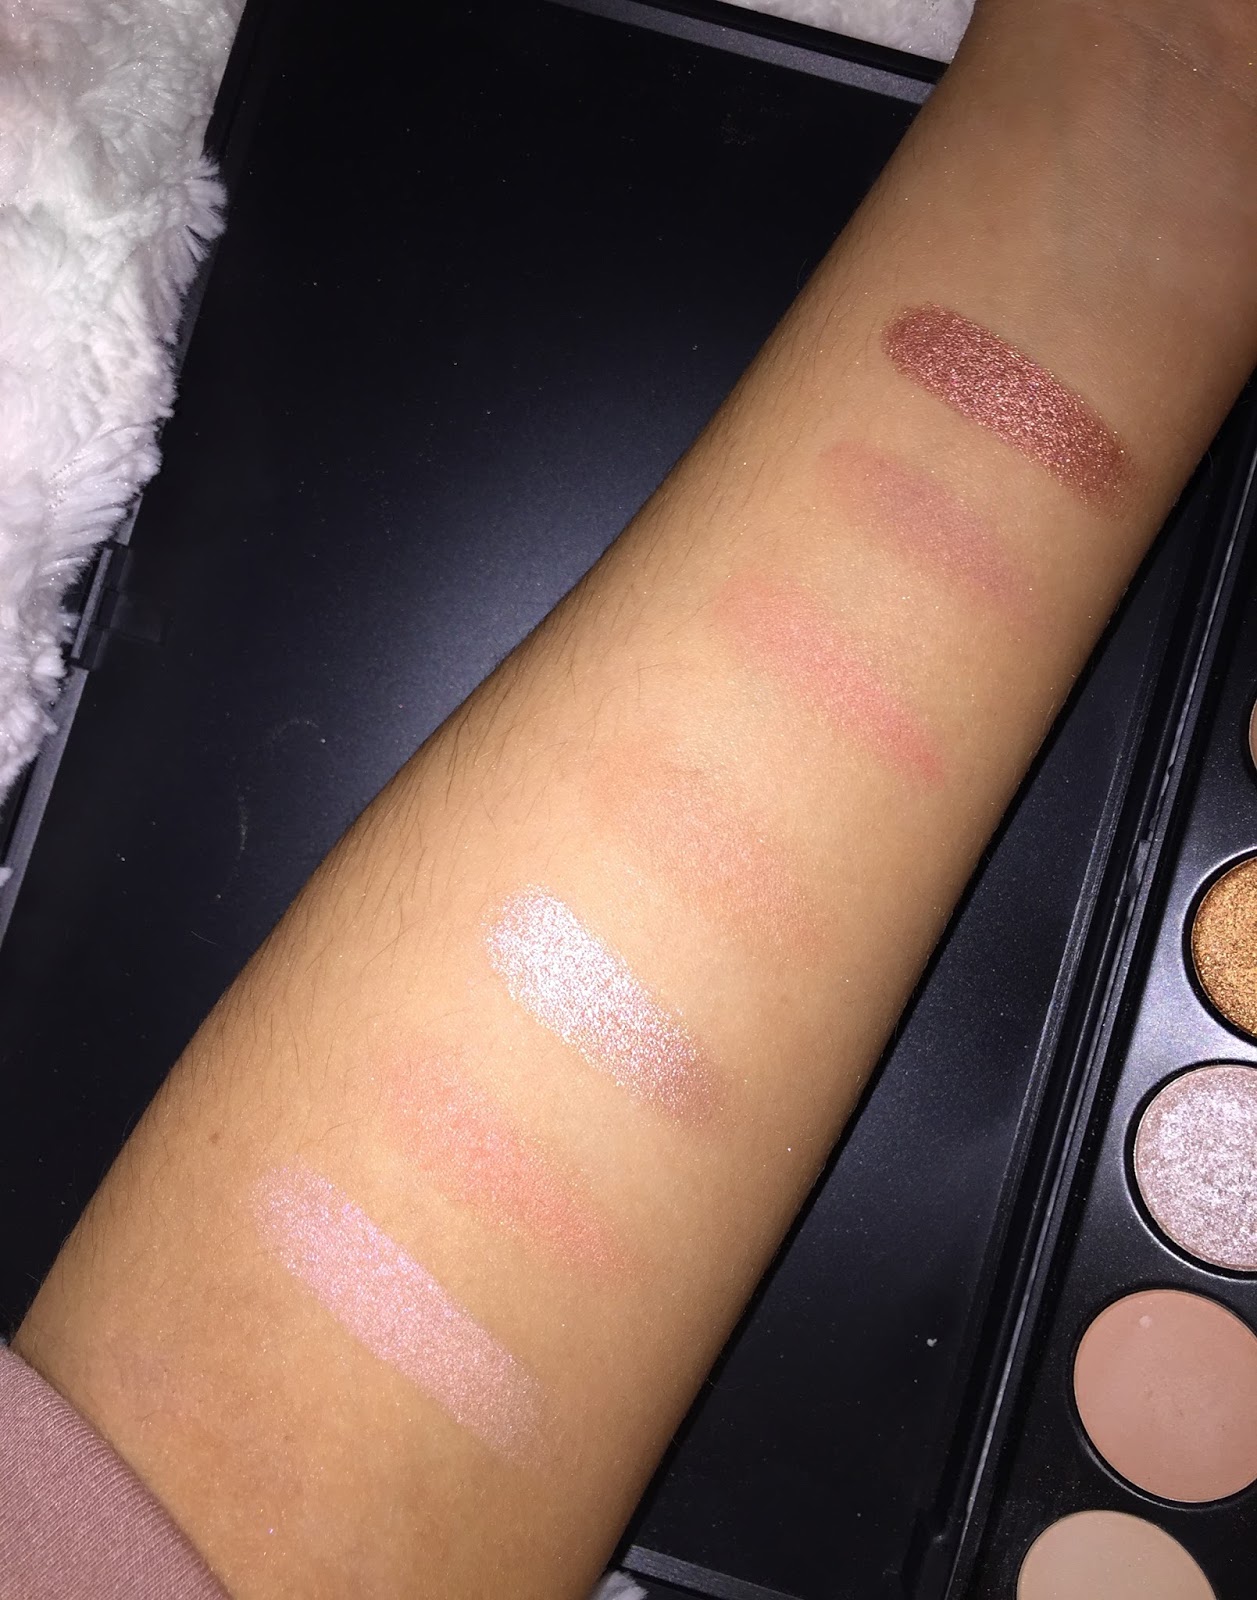
Third row from the top

Fourth row from the top

bottom row

 
Lets get on to the questions I have gotten about this palette being similar to Morphe (namely their 35O palette). 16/21 (76%) of the ingredients in the Morphe 35O palette are the same as the Crown brushes Rose Gold palette and the ingredients that are different are things such as Kaolin (which is a clay & is in the 35O palette) and Lanolin (Lanolin helps to form an emulsion & possesses adhesive characteristics - in the 35O).
I have heard rumors that Morphe private labels from Crown Brushes (meaning that Crown make the palettes and brands like Morphe pay to put their name on them) - but honestly that is just something I have heard and I cannot comment on the authenticity of it. 
I would think however, due to the ingredient similarities that there is some type of correlation. 
The colour scheme in both palettes in very similar - after careful studying what it seems to me is that the majority of the colours in the palettes are the exact same but they are arranged differently which is what tricks the eye. 
I can't comment on the quality of the Morphe 35O palette as I do not own it, so the one I would be recommending to you guys to go out and grab is the Crown Brush Rose Gold Palette as it is the one I have tried, tested and loved! I think you guys will love this palette and get SO much use out of like I have!

With Love from,

Rebekah x


SHARE:

How I style my shorter hair | Beachy, Messy Waves

Hi my Loves,

Recently, I took the plunge and got the hair chopped - it was WELL over due believe me!
My hair just looked sad basically, it wasn't that it was damaged or even dry; it was just looking blankety and shapeless - and generally wasn't doing my face shape any justice. I ended up getting about 8- ish inches off which is quite a bit, especially as my hair was long. I've actually had loads of questions about the cut I got and it basically falls just above my chest and there are lots of layers because I wanted lots of volume and movement - I wanted that I rolled out bed and my hair just looks like this type of look. My inspo picture that I took in was actually of Chantel Jeffries (you can find her on Instagram) and I was just OBSESSED with her hair. I got my hair done in Pelo Hairdressing in Newbridge; I've been gone there the past year and half and I won't let anyone else touch my hair now - I just always love how it turns out and that's so important.


So as always when you get a new hairstyle you have to get to grips with how you like wearing it and how you want to style it. When styling my hair Khloe Kardashian & Chrissy Teigan are what I use for inspiration - their hairstylist is Jen Atkins and she gives amazing hair tips. They both rock that messy, beachy look and I just love that.


All images of Khloe are from @khloekardashian on  instagram


So here is what you will need:
- Volumising mousse (I use 
- Heat Protecting spray
- Curl promoter (only if your hair is basically straight like mine)
- 25mm curling tongs
- Dry shampoo
- Hairspray


Got2b Twisted Curling mousse here & VO5 Plump it up Backcombing spray here

L'Oreal Creme de Mousse (Volume & strong hold) here, L'Oreal Heat Styling spray (3 day volume) here , L'Oreal Elnett Precious oil extra strength hairspray here

  1. I add the volumising mousse to my roots & the curling mousse I have to the ends when it is wet, this is just to help my hair take a curl better because it is not naturally wavy.
  2. Next I apply my heat protector spray.
  3. I divide my hair into 3 sections and then your fringe or bangs if you have them.
  4. I start off by curling the bottom layer first. The technique is simple once you get the hang of it - you want to work your way around each section, curling each piece if hair in alternating directions and leaving the bottom 3 inches of each piece uncurled. E.G. curl the first section of hair closest to your face in the direction away from your face -wrap the hair around the barrel but leave the end 3 inches out, wait 10-15 seconds and release the curl. Next piece of hair in the section, take it and wrap it around the curling tongs only this time curl it in the direction facing towards your face. Leave the end 3 inches of your hair loose whilst curling same as above.
  5. Repeat the same steps for each section & remember after you release each curl give it a scrunch in your hand before you move on to the next piece.
  6. If & when you come to your fringe area, curl these pieces in the same way as above but make sure they face in the direction away from your face to flatter it the best.
  7. Back comb any sections you feel need more volume and add dry shampoo to the roots if you want even more volume
  8. Use the hairspray to keep it all in place.
I HOPE THIS ALL MADE SENSE!!!! 
I know it is so hard when I can't show you on video but hopefully you all get what I mean and I helped those of you wondering how I do my hair.

With Love from,

Rebekah x


SHARE:

Tuesday 7 March 2017

My favourite MAC lipsticks | The Nude Edition

Hi my Loves,

I have just recently been reminded of my love for lipstick, the actual standard bullet type lipsticks I mean! I am a huge Liquid lipstick fan and to be honest they are all I've been wearing the past year probably. Last week I was cleaning up my makeup area & found myself tidying my lipstick drawer. I got to playing with some of them and swatching them and I have to say I've re-found my love for the bullet lipstick!
MAC lipsticks are some of my all time favourites - yes a little pricey, but there is just something so glamorous about a MAC lipstick and I adore the vanilla smell of them so much!


When it comes to MAC lipstick (and lipsticks in general to be honest) I tend to lean towards nude lipsticks. In my eyes, no two nudes are the same and I will fight people on this! Every time I bring a lipstick home my mother will say:
 "Oh but don't you have something just like that?" 
NO! 
Each shade is special and unique in its own way! I will justify it till the day I die!!
The nude lipstick obsession and trying to find the perfect nude all really stemmed from the Kardashian & Jenner clan and any time I heard they were wearing a specific lipstick, well I just had to have it in my collection too - so I am blaming them for my addiction!

So this leads me on to today's post - my favourite NUDE MAC lipsticks. If you want to reference my skin shade to yours I would be a MAC NC20 at my palest and when I am tanned like in my arm swatch below I am an NC37! 
Lets get right into it:

From L-R Honeylove, Faux, Velvet Teddy, Kinda Sexy, Spirit & Twig


Honeylove (matte finish)
MAC describes this shade as a light beige with a rose tone.

This is the lightest of the nudes I own & it is a warm toned nude. Very Pale nudes rarely suit me (and very few people for that matter) and make me look very ill because of my olive skin tone and I have very pigmented lips naturally making light nudes look just that little bit off. If I'm honest this shade can even wash me out sometimes but I counteract this by wearing a slightly darker lip liner and it looks amazing. If you are on the hunt for a light natural nude, this is definitely something you will love - fair skinned girls will also be major fans.

Faux (satin finish)
MAC describes this shade as a muted mauve pink.

This is more pinky nude and more so a shade closer to your lip colour which is actually my favourite type of nude and the type that is easiest to wear on a day to day basis with no fuss but you still look polished.
This is a gorgeous rosey nude and the satin finish means that it is comfortable on the lips. This one was purchased in my obsession days of trying to find the exact colour Kylie Jenner wore on her lips daily (you know before she came out about the lip filler and had us all thinking it was honestly just good lip liner and lipstick technique....) - it's the perfect type of your lips but better shade and very Kylie.

Velvet Teddy (matte finish)
MAC describes this as a deep toned beige.

I literally spent weeks trying to get my paws on this when Kylie Jenner supposedly said she wore this - it was sold out everywhere but I was determined to have it.
This is definitely a more pinky/brown toned nude and if you are fair this could come across as a darker nude on your lips. This is a very 90's esque colour and I love these type of shades.

Kinda Sexy (matte finish)
MAC describes this as a neutral pinky-rose.

This is definitely a peachy pinked nude (can I possibly put any more colour spins on 'nude' haha!) but is still very natural. This can play quite warm and on cooler, fairer skin tones can pull coral peach rather than pink peach so just be mindful of that. This is a good lipstick to pair with any look as it is not to overpowering and compliments a smokey eye lovely.

Spirit (satin finish)
MAC describes this as a muted pinky-beige brown.

So it's a little bit of everything according to MAC. This is the darkest nude I own from them - this a very like Velvet Teddy, probably two notches darker and a stronger, richer brown base. This is definitely one if those brown toned nudes, again very 90's esque. I think this shade is best suited to medium skin tones in order to get a true nude lip but if you are fair and don't mind a slightly darker lip this will of course work for you too. 

Twig (satin finish)
MAC describes this as a soft muted brownish-pink.

So out of all the shades, this is definitely the most mauve-y toned of them all. If you own MAC's Whirl lip liner, these two pair gorgeously together. This is another one of those colours that would lean more on the your lips-but-better spectrum, although this is probably slightly darker it would enhance a lot of people's lip colour. It is a gorgeous colour for everyday wear and gives that polished effect that Faux gives too. This shade is richer and deeper toned than Faux.


I hope you guys found this helpful! It can be confusing when you go into MAC and see all these colours, it's hard to know what to ask for or what you even might want - so hopefully I have helped some of you out! You can purchase MAC from MAC's online store if you are from the U.K or the U.S - House of Fraser also now carry MAC which you can order online as well as Arnotts (in-store only) & Brown Thomas in-store & online for us Irish gals.

With Love from,

Rebekah x


SHARE:

Monday 6 March 2017

Bellamianta Self Tanning Tinited lotion | Yay or Nay (review)

Hi my Loves,

We are going to chat today about Northern Irish Tanning brand 'Bellamianta' - their medium Self Tanning lotion in particular.
I purchased this tan myself after hearing rave reviews from all these golden goddess beauty bloggers - so naturally I was like "I'll have whatever she's using thanks!" Whenever I would ask anyone what tan they were using Bellamianta's name kept cropping up and I know I'm late to the bandwagon with trying it but I was deathly committed to a another tan and couldn't drag myself away from it until I couldn't get my hands on it last week and had to try something new!


So lets start with the facts first:
Price: €20.00
Colour scale: Medium (olive/green undertone)
Foam/liquid: Dark tinted Lotion
Developing time: 2-4 hours
Lasting time claims: up to 7 days
Where to buy: Bellamianta & Cloud10

This tan contains no harsh chemicals, parabens, animal derivatives, alcohol, perfume, G.M.O's or Sulfates. (It's fantastic that it contains none of these things.)

Ingredients wise in this tan you will find fruit extracts such as Mango, Papaya & Goji Berry which work to 'help you get your signature golden glow'. You will also find Bergamot & Vitamin E which helps with firming, toning & anti-aging; Saccharide Isomerate which hydrates the skin making it great for dry skin types and then Shea Butter & Aloe Vera are also listed ingredients.

I picked up this tan in Vista Pharmacy in Naas as it was the closest place to me to pick it up. My snapchat followers will know that I made a rookie move of presuming that their Tinted Lotion & their Rapid Mousse were the same shade in terms of colour however please note that is not the case. Their tinted lotion is a medium colour tan where as their mousse is their dark tan. I will be popping back to get the mousse as a darker tan is more up my street but we can chat about that in another post.

How I like to apply all my tanning products is always before bed and then I'll sleep in a onesie (CUTE, I KNOW) - so I did the exact same with this tan as it states on the bottle that for darkest results leave on overnight.
 It applied smoothly and evenly, with the dark tint making it easy to see where you were applying the tan and it dried down quickly so I could get dressed - which is essential because I hate waiting around for tan to dry before you can get dressed.  
Now, we all know how it is going to bed with a fresh tan layer, the sheets may or may not survive to the tell the tale; however with this tan it does not transfer to my sheets at all and I'm majorly impressed by that! There is sometimes a very small amount of transfer on my onesie but we are talking barely noticeable.
There is also no nasty fake tan smell, this actually has a gorgeous fresh smell.

I like to wash my tan off then first thing in the morning and it looks VERY dark (dare I say almost orange-y) before I wash it off - but after my shower it turns out a lovely sun-kissed glow that looks very natural and I have no streaking or clinging to areas which can happen around my neck and wrists. As a dry skinned gal (mainly because I NEVER moisturize my actual body) I can absolute vouch that this tan is very suited to dry skin and it definitely does not make the worse or promote scaling - if anything I feel that my skin is MORE moisturized than before I tan myself. I also suffer from eczema on my legs and this has not irritated it or caused any flair ups which is extremely important for me. 

The really great thing about this tan though is how it fades. 
When I'm evaluating and reviewing a tan I don't just look at how it applies and looks straight off, it's very important to me how it wears and how easily I can get it off I need to.
This tan wears off so evenly and so naturally. There's no clinging to areas, no scaly patches - the colour just gradually gets lighter - this means you can add another layer on-top if you like without risking patching. If I decide by day 4 I want it gone it can be removed very gently with baby oil and a scrubby glove - no tearing at the skin, small circular motions will break it down and that is a dream to me.

Would I recommend this tan to you guys?
Absolutely.
I think that in particular this medium shade lotion would be amazing for brides especially as there is no transfer to clothing so it which means whites are relatively safe.
If you have dry skin I think this tan will tick the boxes for what you've been looking for in a tan; hydrating and moisturizing and no snake skin.
All in all it is a fantastic tan that really is very luxurious and stays true to it's claims which is a winner for me!

With Love from,

Rebekah x


SHARE:

Thursday 2 March 2017

L'Oreal Infallible Total Cover Foundation | Review

Hi my Loves,

I hope you are all well! 
Today's post is all about L'Oreal's newest foundation - The Total Cover Foundation.
If you follow me on snapchat (it is @rebekahwithlove if you don't!) I am sure that you've already  heard me speaking about this foundation & how it is the best thing since sliced bread BUT I wanted to write a more in-depth review because I've still had a lot of questions on it plus, not everyone is a snapchat fan!

The Foundation claims
(This is from boots.com website)
"Discover Infallible Total Cover Foundation for a flawless, full coverage base that lasts up to 24 hours. The zero compromise, camouflage formula covers everything from blemishes, redness and tattoos without the overload, while the matte finish leaves you with an even, shine-free base.
No compromise. No transfer. No overload"

You can buy it from here or here and it retails for roughly €10.99.

Shade Range
 In the UK & Europe this foundation is available in 7 shades. (The US has a different bottle and different shade names.)
Could it have more shades? Yes most definitely. The lightest shade isn't all that light to be honest. I am an NC15 (with olive undertones) in MAC for reference and the lightest shade 9. light sand is actually a smidge too dark for me but I can make it work with a lighter concealer. There is only one shade for darker skin tones too which is a little disappointing.

These are the shades:
  • 9 Light Sand
  • 10 Porcelain
  • 12 Natural Rose
  • 21 Golden Sand
  • 24 Golden Beige
  • 32 Amber
  • 33 Cappuccino  
Shades 9 Light sand & 21 Golden sand


Skin type best suited to?
I have normal/combination skin which leans more to slightly dry and dehydrated than it would to oily and this foundation sat on my skin perfectly. As I mentioned above, I think that this foundation will work for oily skin you just might need to powder your skin whereas I did not have to. As for dry skinned girls - this probably wouldn't be my first choice of foundation to recommend to you if your skin is extremely dry in terms of flaking or cracking etc. as it is a matte foundation in will cling to those dry areas. If you lean towards slightly dry that is nothing too drastic, this will work perfectly just make sure to moisturize before hand (as you should with every foundation BTW and prime if you want to.)


My Thoughts
This foundation has not left my face since I bought it almost 4 weeks ago - it has been the only foundation I have used since then and it is my new favourite even above my high end foundations!
 I initially bought the lightest shade first and then bought my tanning shade 21 Golden Sand I loved it that much. 
This foundation is incredibly full coverage, incredibly matte and incredibly long wearing (I've not ever worn a foundation for 24 hours in my life - but it lasted me 12-14 hours which is a dream) - all whilst still feeling light on your skin. It completely covered my blemishes and spots, my pores and my ridiculously dark under-eyes and left me with the option of using no concealer which I have never experienced before. I also did not have to use any powder as the matte finish sets itself and truly does not need to be set unless your skin leans oily and then probably only in the t-zone area anyway.
The best way to apply this foundation is with a buffing brush in my opinion and to work in sections of your face (e.g. Dab some on your right cheek and nose then blend it in, dab some on your left cheek then blend it in etc.) as it dries down quickly and can be hard to work with if your aren't quick enough with your blending - and once this sets, it is going NOWHERE.
If full coverage is not your thing this foundation is not for you - whilst it looks flawless on the skin it will look like you are wearing makeup, however it does not look heavy or cakey.
I am extremely impressed with this foundation - I did not expect to love it as much as I did and now I can't be without it!

I hope you guys found this review helpful! If there is anything else you would like me to review please let me know and I can look into it for you!

With Love from,

Rebekah x


SHARE:

Wednesday 1 March 2017

The Ordinary Skincare & My Skin Chats

Hi my Loves,

How are you all? I hope you're all having a lovely week!
I'm sure many of you have heard me moaning and complaining about my skin the past few weeks - after Christmas it just decided to play absolute havoc on me. I've not had bad skin for years and I've managed to keep it under control so to see it becoming bad again was extremely difficult for me, especially seeing as I take very good care of my skin, I eat relatively okay and get enough sleep and I had not changed anything at all. 
It had taken me years to get my skin to a good place so when I say I was very upset about my skin playing me, I'm being very honest. It seems so silly to people who have good skin or are used to having good skin to hear people giving out about spots and bad skin, they can't seem to understand but it is extremely hard dealing with bad skin and it really affects your confidence. It got to a point there recently where I wouldn't even want to leave my house or even go near a mirror I was that conscious about it and this might sound dramatic to some people but this is how it makes me  feel.

I am not a person however that cries about things and doesn't try to fix them so I went on a mission to over haul my skin. 
It turned out I had a slight allergy to eggs in the end that was causing my bad skin (typical) so I'm glad I got to the bottom of it. I still decided to over haul my skincare as my current products weren't enough to shift the issues the allergy had left me with like blocked pores, sore under the skin lumps, milia like texture on my forehead and redness, YES I literally got it all.


I had stumbled across a skincare company called Deciem a while back and had been intrigued by their products, especially their line of skincare called The Ordinary. The Ordinary is a brand that provides its customer with great skincare products, including amazing 'wonder' ingredients that cost a fraction of the price in comparison to their competitors. As a skincare junkie, when I saw they stocked products like Hyaluronic Acid, Retinol and Vitamin C (Vitamin C that was packaged CORRECTLY to maintain its properties) that were all under €10, I honestly nearly died. I couldn't believe my eyes - I just couldn't understand how these amazing products were so cheap! Not one of their products was over €20 and these products had ingredients you would pay well over €40 each for!!
So naturally, I placed a substantial order because I just had to test it out for myself - because if these products worked like they should my skincare game would be changed forever.
I am going to individually review each product I bought as they each deserve their own post but I will list to you what I have bought and tried:


Each of these products is amazing, I cannot say enough good things. 
My skin is finally nearly back to looking like itself again and even better in some ways too which I am over the moon about. I cannot recommend that you guys check out this brand enough. They have regimen guides on their website that you can follow to create your own regimen or if you have an questions message either the company or me. You can completely over haul your entire skincare plan giving you top of the range ingredients and benefits with this brand for about €40(ish) for everything and if that isn't a bargain I don't know what is!

You can purchase The Ordinary from The Ordinary website, TRND Beauty or Beauty Bay so whatever is your preference you have tonnes of options.

Once I have my singular reviews up I will link them here on this post - I was just so excited I had to tell you guys about it now!


With Love from,

Rebekah x


SHARE:
© Rebekah with Love

This site uses cookies from Google to deliver its services - Click here for information.

Blogger Template Created by pipdig