Beauty and Fashion blog by Rebekah O'Leary

Wednesday 25 November 2015

Christmas Gift Ideas ♡ ( part 1 - 'The beauty-addict girl')

 
Hello my loves,
 
I hope that you are all extremely well & are looking forward to the up and coming Christmas festivities!!
 
Like I've mentioned before I work in retail - so it's really hard to get excited for Christmas because for us retail workers Christmas means one thing and that's longer, busier days. I've also been looking at Christmas decoration since the day after Halloween so talk about it being pushed on me BUT none-the-less I am still looking forward to Christmas!
 I think it's so funny that for me now at this age of my life, I actually would give up all my presents just to have the few days of Christmas off - for me getting to spend 3 or 4 days off enjoying Christmas spirit and spending time with my boyfriend and my family would out do any present I could ever be bought!
Before I launch right into my list of present ideas for that Beauty loving woman in your life; be it a girlfriend, a best friend, your mam, whoever -
 I want to take a moment to ask everyone that while you are out doing your Christmas shopping on the late opening nights, St. Stephen's day/boxing day etc. - PLEASE do be patient and well mannered to the retail staff who are working these hours to cater for everyone trying to buy presents, it is very hard for us to be surrounded by Christmas but not really get to celebrate it, plus we are only human - we know that it can be stressful picking presents and all that but we can only do our best!
 
Little rant overrrrr.. let's get into my list..:)
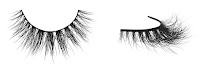
 
Mink Lashes
 
I'm a huge mink lash fan and any beauty addict would only love to add a few pairs of these to her collection. My favourite brands are Lilly Lashes & Velour lashes - I've order from both sites and both are 100% perfect. My favourite Lilly Lashes are the 'Miami' style & from Velour Lashes my favourites are 'Sho fluffy' & 'WINGing',
Velour lashes have been worn by likes of Beyoncé & Jessica Alba and Lilly lashes are adored by the Kardashians & Jenners as well as Pia Mia. If they're good enough for them....:)
 

 (Top - 'Sho fluffy', Bottom 'WINGing')
(- $35)


( Lilly lashes in 'Miami')
 (- $30)
 
 Eyeshadow palettes
 
You've a few options here that I think anyone would simply adore to have in there collection:
 
1. Too faced Chocolate bar palette

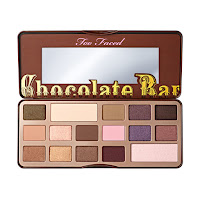
FYI - this literally smells like chocolate - if your girl is a chocolate addict, get her this - you get to be uber thoughtful AND get be a winner in the present books. (- €47)
 
2. Morphe 35N/35T palette
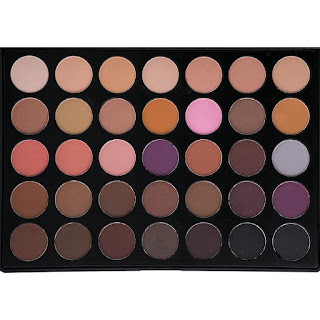
(Top - 35T, Bottom - 35N, both are amazing - don't fret if you don't know which is better, they are both equally as good as each other also €24 for 35 amazing eyeshadows - these are palettes that look 100 times more expensive than you would ever think)
 
 
This is cult - it's only available online so it makes for a seemingly 'special/exclusive' pressie. It is also special edition & a collectors edition type product for beauty lovers! (- €38.50)

 
 Skincare Surprises

Foreo Luna


This Swedish product is hailed as a more pocket friendly Clarisonic because you don't have to repurchase the heads, there for more economical you know. It has very good reviews and would be a really good present because it isn't the type of item that you would think to splash on yourself - but it would be such a lovely luxury treat! (- €140)

Charlotte Tilbury Magic Cream

Hailed as being supermodel skin in a jar, this is a moisturiser you will want in your life! At €90 a jar, it's a little expensive to splash on yourself, so what better than to get it as a present.
 
 
Such a luxury little set by an amazing skincare brand - this is perfect for anyone mid 20's and up - read the reviews yourself, the laser free collection is fantastic. (- €66)
 
Another great set by Peter Thomas Roth is his Hall of Fame gift set - it a selection of smaller version of some of the best selling products - that way the person receiving the gift gets to test and see what they like! (- €33)
 
 
Hair tools
 
 
8 different ways to curl your hair - you are guaranteed to find at least 4 that you love. It's a great present that is of great quality and gives people so many options out of one present
(- $300 HOWEVER on their site they are selling for $119 NOW. Also if you google NUME discount codes you can always find really good discounts)


The ultimate Victoria's Secret hair in a flash - these use top notch technology so that they heat quickly to match what you need and they heat from the core which means your curls get the heat not your hands. (- €160)
 
 
This is loved by celebrities everywhere - it gives you a blow dry that looks like it came from a salon. Lots of people found the previous version of the Instyler hard to use because it only rotated one way, but with the MAX they have corrected this and it now rotates both ways, so thank you Instyler!!
(- €99)


Beautiful Brushes
 
 
These are my ride or die brushes. They are literally PERFECT in terms of quality and texture AND because they look so beautiful they make amazing Christmas pressies.


Stocking fillers/Secret Santa's/other little treats
 
 
If she loves to glow, she will love this, shade moonstone - people have fought to get this stunning highlight and Cult beauty have it in stock now.. run! (- £30)


3 new limited edition metallic liquid lipstick - Teddy, Scarlet lace & corset. These are stunning colours and perfect for anyone who loves lipsticks. (- $58)
 
 
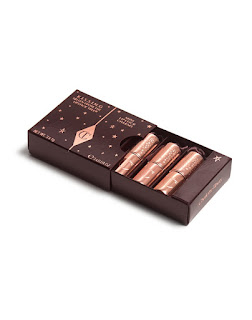
Three of Charlotte's favourite mini K.I.S.S.I.N.G lipsticks - the colours are Penelope pink, Bitch perfect and So Marilyn red! (- £29)


Cute & they taste like amazing drinks - what else can you want to make your lips soft & juicy. (- £9)


My favourite glitters, you can use them for eye look, lip looks, nail looks they are for everything! (Prices range between €6.50 for a single mini jar and as high €69 for 7 large bottles)


GORGEOUS nail polishes in on trend shades. (- €18)


(So pretty & perfect for holding your toiletries this one is €40 & they have other styles available on ASOS too!)


Nars blushes are some of the best, no competition.
This is a limited edition set & ASOS are offering 55% off at the moment making this an absolute STEAL at €66!
 
 
This set is soooo cute, the little EOS tubes have little designs on them for this set making them something you can't buy separately. Also to add, these are some of the best lip balms I've ever tried. I always have one in my handbag. (- £18)
 
So that about wraps up my gift guide for those beauty addicted women in your life!
If you have any questions on any of the above products please leave me a comment and I will get back to you ASAP to help you!
 
I will have another part to my guide coming in the next few days so keep them eyes peeled!<3
 
Happy shopping and as always,
 
With Love from,
 
Rebekah x ♡


SHARE:

Friday 20 November 2015

My hair care heroes ♡

Hello my loves,

Let's talk hair today. 
If I'm honest, I'm hit & miss with my hair care routine - sometimes I'm really good with my leave in conditioners & heat defense sprays and then other times, let's face it I'm just that bit too lazy or tired. 
When I do slack with a good hair care routine I can really feel it in my hair by the texture and just the regular look of it. I feel my split ends are more visible & my hair tangles easier. 
My hair has had a rough life (queue the melodrama) - I've cut it every way you can imagine and I've also fell victim to bad extensions that basically left me with bald patches - my hair has also been double bleached in one sitting, not to mention that I've been dyed most colours now. I've put my hair through the wars I'm not kidding.
Finnnaallyyy though I have gotten my hair to it's total natural colour & it's starting to grow longer which I love. So now I'm all about keeping it long, healthy and shiny but still voluminous - I don't ask for much.
These are the products I now use very frequently to keep my hair in the best condition it can possibly be.

The Shampoo:

Boots €9.99


Are you looking for a salon worthy collection of products with drugstore price tags? 
Then make Mark Hill your go to. I adore his hair care products. First off: the smell of them all is literally divine - but the quality is amazing. I'm a hair care whore (sorry, but it's true) I flit back and forth between shampoos and conditioners never being able to tell the difference usually, with the exception of his shampoo. I always return to Mark Hill products because they do what they say on the tin. This is the newest one of his shampoos that I'm loving and I love it because I really can both see & feel the volume.

The Conditioner:

Boots: €9.99

Same situation as above. The smell, the quality, the doing what it says on the tin. The MiracOILous condition has been my go-to for the past 6-8 months and I can honestly say that can attribute my soft, nourished hair to this conditioner. I love it so much I've traveled an hour to a specific chemist to get it! I won't use anything else. I ran out a while back and had to use another to tie me over & I could notice the different straight away - my split ends were visible and my hair just felt dry and crispy. A few days later I returned to using this conditioner and the dryness disappeared - I HIGHLY HIGHLY HIGHLY recommend this conditioner. 

The hair mask:

HASK Argan oil Deep Conditioning hair treatment
Penneys/Primark/Ulta: Around €2.

So I've blogged about this before and you can check that out here. But this is my favourite hair mask OF ALL TIME, ever ever. When my hair was bleached I need something strong to bring it to good quality and this was when I stumbled upon this brand one day in Penneys. This made my bleached hair look like real hair once again. I can't describe what it does it's that good, it's the kind of see it to believe it product but I urge you to purchase this and I promise you won't regret it. This is a hair savior. It takes dry hair and makes it silky again.

The oil:

Boots: €12.99


Every single time I wash my hair this is the one product that I will add 2 pumps of always to my towel dried hair. This oil is my favourite of the ones that I have tried by far. Others leave like an oil residue on my hair, weighing it down because my hair strands are fine but this one doesn't do that. It literally just nourishes your hair. Added bonus is that the bottle lasts you FOREVER. I've been using this for 2 years and I have only used 3 bottles so there is the proof!


The mousse:

Boots: €7.99


My favourite mousse to add both volume and hold when I curl my hair. I don't use this everyday but if I want my style to hold or if it's the weekend and I want nice hair I will always apply this to towel dry hair and blast my hair with the hair dryer upside-down. It doesn't leave your hair crunchy and you don't feel like you've loads of product in your hair making it greasy which I also love.


The something a little bit extra:

Boots: €9.99


I know that I keep referring to the smell of things but MY GOD - this smells divine. It basically smells like you're drinking a Pina Colada, on the beach in the Bahamas. I'm not totally sure what to describe this product as completely to be honest, basically the claims are:

  • Conditions
  • Improves shine
  • Strengthens
  • Helps repair damaged hair
  • Nourishes
  • Softens and smooths hair

It also claims to hold styles for longer. 
I can vouch; after using this for a month, that it does all of the above. It makes my hair look and feel in really good condition and whatever I choose to do with my hair - it holds it. I sometimes will use this, dry off my hair and pop it into a plait and in the morning my hair has proper defined waves that hold well. (this NEVER happens for my hair, I usually just get kinks from plaits!) I use this every time I wash my hair now, I am totally obsessed.

So these are my hair care heroes girls - I have been using these for months now so these are things that I know most definitely work and are very good products!
 I'm a beauty junkie so I try many things, but these are the heroes for me!

I hope you all enjoyed this post, I have another one coming over the weekend and it has a little something to do with Christmas......;)<3 So keep an eye out!

With Love From,

Rebekah x ♡


SHARE:

Tuesday 20 October 2015

Kim Kardashian Inspired makeup (Blue smokey eye) ♡

Hello my loves,

I'm back this week with another celebrity inspired look. I decided to do another one this week because my last Kylie Jenner inspired look went down so well with you all!
Anyone who knows me, knows that I am literally 'Kardashian' obsessed & I'm not even sorry! I think that each girl is just beautiful and I adore all of their individual styles - but Kylie and Kim usually wear my favorite makeup looks. The man behind the majority of Kim's looks is 'Mario Dedivanovic' (check out his instagram @makeupbymario) and he is the one who created the look that I was inspired by on Kim in the first place!

So this is Kim's look:


It is a blue smokey eye with a deep dark red lip.
I know what you are thinking;
 Can I do bold lips AND a bold eye?
The answer to this is, yes of course you can.
 It's just all about how you do it and that's what I am here to show you.
 I'm not a big colour on my eyes kinda gal to be honest but I really wanted to recreate this look and I'm really happy that I did because I think I've converted myself to using colour a bit more often! When you're using actual colours the trick REALLY is all in the blending and tones - this is how you will avoid that dreaded clown makeup/throwback-to-5-year-old-self-with-your-toy-store-makeup-kit type of look. You want to create depth and that's what will give colour a grown up touch!
So this is my interpretation of Kim's look:


This is an inspired look and it's not going to look identical on me, because unfortunately I'm not Kim Kardashian! But this is my take on it and I really hope that you enjoy  - so let's get going!

|FACE|

(For this look I basically went ahead and did my face very similar to how I did for my Kylie Jenner inspired look so you can check that out HERE)

- Makeup Forever Ultra HD foundation
- Barry M Flawless concealer
- Anastasia Beverly Hills cream contour kit (light)
- Anastasia Beverly Hills powder contour kit (light-medium)

|EYES|

- Your cream contour shade (mine was my Anastasia shade in 'light sculpt')
- Rimmel London 'Kate' eyeshadow stick (electric sapphire)
- A true dark navy blue eyeshadow (the one I used is some very random No7 shadow but a perfect dupe would be 'Deep truth' by MAC, 'Evidence' by Urban Decay or 'Star Cobalt' by Anastasia Beverly Hills.
- A matte black eyeshadow (I used 'Blackout' by Urban Decay, but ANY matte black will do.)
- Black Kohl pencil
- Beige eyeshadow (I used Vanilla from MAC)
- Too faced Better than Sex mascara
- Lilly Lashes (3D mink in 'Miami')


1. Apply your cream contour shade to the crease of your eye, this gives us something to blend with.
2. Apply your 'electric sapphire' eyeshadow stick to your eyelid and stop at your crease.
3. Take a clean blending eyeshadow brush and using windscreen whipper motions blend the blue shadow stick with your cream crease shade. This insures there are no harsh lines and that your blend is seamless. If you feel you've lost colour intensity with the blue on your lid you can always add more. Blend the Electric Sapphire out slightly towards your brow exactly like I have done in the picture above
4. Next take your true navy blue shadow and very softly add this to your crease and pull it out towards your brow exactly like we did with the electric sapphire. This helps to add your depth to your eye look because you have used 2 different shades of navy and 2 different textures.
5. Line your lower lash line with the Electric Sapphire pencil and also line your waterline.
6. To blend and set the lower lash, run your navy blue shadow over the top of it.
7. Add some of the black kohl to your waterline to deepen up the blue you already placed there.
8. Because we aren't using liner for our upper lash line, I used my matte black eyeshadow and pressed this against my upper lash line to define my lashes. I also added a small amount of the black to my 'outer v' and blended this towards the end of my brows too.
9. Use your beige eyeshadow to highlight under your brows.
10. Apply your favourite lashes. I used 'Miami' again because they are so similar to the ones Kim has on. I then just lightly coated my top lashes and bottom lashes.

|LIPS|

- Barry M lip liner (Red)
- Jeffree Star cosmetics liquid lipstick (Unicorn blood)
11. Line your lips with a red liner to enhance that 'red' and fill in your lips with a very deep burgundy red lipstick of your choice. If your feel your lips aren't red enough, simply add some lip liner to the lipstick on your lips.

And by this point you should all be rocking a Kimmy K-esque look! :)
I find the best way to copy makeup from breakdowns like what I've done is to look at the look you're copying while you follow the steps - that way it will become real for you!

I hope you all really enjoyed this!
If you have an blog requests or even if you have any celebrity inspired looks you'd like to see , let me know and I'd be only happy to try them out!

P.S. My top is a Deep V blouse from Nine Crows!

With Love from,

Rebekah x♡


SHARE:

Tuesday 13 October 2015

Kylie Jenner Inspired makeup look ♡

Hello my loves,

Today's post is going to be a quick tutorial on a look that I posted to my Instagram & Facebook page yesterday. I saw this picture of Kylie Jenner on both her Instagram page and her makeup artist who created this look 'Styled by Hrush' Instagram page (Check her out she's amazing!!!), 
AND I FELL IN LOVE!!!!


( Credit +StyledbyHrush )


In this look, the brown colour she was wearing on her lips was a shade from her yet-to-be-released lip collection called 'Kylie Lip-kit' that I'm obviously DYING to get my hands on. This look is another perfect autumn look. The dark lips, shimmery eyes and contoured cheeks are to die for.

 *I'd love to know if you guys like these kind of posts also? Do you like celebrity inspired makeup looks? I'm contemplating maybe doing video tutorials to accompany some posts, let me know if this is something you'd like to see <3

So, for my interpretation of her look I used items similar to ones she would of used and by brands I know that she loves, so you can substitute anything I use for a cheaper alternative of course:


 So let's get right into it.
 For this look you will neeeeeed:

|FACE|

-Barry M flawless brightening primer (Best drugstore primer!)
- Nars All day luminous weightless foundation (basically a good coverage foundation that is not too thick and drying)
- Nars Radiant Creamy concealer (A Kylie fave. Actually a lot of celebrities swear by this)
- Anastasia Beverly Hills Cream contour kit (I use the fair kit - you can use whatever you like for cream contour, I personally do recommend investing it this though, it's the b.o.m.b)
-  Anastasia Beverly Hills powder contour kit (I use light-medium)
- Rimmel Sun Shimmer bronzer

|EYES|

- A credit card or something with a straight edge (bare with me here!)
- Too Faced chocolate bar palette
- L'Oreal superstar liquid eyeliner
- Barry M gold pencil liner
- Too faced better than Sex mascara
- Lilly Lashes in 'Miami' (These are Kylie's faves)

|LIPS|

- Mac 'Spice' lip liner (This is one of her said go-to lip liners)
- Jeffree Star cosmetics liquid lipstick in 'Dominatrix'

1. Apply your primer all over your face, buff the foundation of your choice into your skin and using the concealer, conceal any dark circles you have under your eyes.
2. Contour & highlight your face. I have an entire post on tips of how to highlight & contour so you can check that out here. Basically, I will take a yellow shade of cream contour and highlight the places of my face where the light naturally hits & places that I want to draw attention to. (underneath my eyes, down the bridge of my nose, to the centre of my forehead and under where I will contour under my cheekbones). Then I will take a medium brown contour cream and 'contour' all the contours of my face.(Under my cheekbones, around my hairline, down the sides of my nose, around my jawline) Blend all this product in with a beauty blender for the best result.
3. To set your creams in place you need to use a corresponding powder shade over where you have both highlighted and contoured. This is why I use the Anastasia Beverly Hills contour powders because it has all the shades I will need, but you can use your own light powder and contour powder/bronzer to dust over your creams and you will get the exact same effect.
4. To get the super bronzed cheeks that Kylie has in her look, I just took my big Sun shimmer bronzer and added some extra bronze to the apples of my cheeks as a blush.
5. Fill in your brows as you like.
6. For the eyes I stuck to using colours out of one palette which was my 'Chocolate Bar Palette' by Too Faced. 


* The colours I used were: Salted caramel, Semi sweet, White chocolate & Creme Brulee*

6. This is where your credit card comes in to play. Line up the card on the outer corner of your eyes going diagonally towards your brow, this will help you to create that cat-eyed, almond shape eye look. Hold this card in place while you apply your eyeshadows. White chocolate is placed under your eyebrows on the brow bone, Salted caramel goes in the crease/ socket of your eye, creme brulee goes all over the lid of your eye and semi sweet goes on the outer v/outer third of your socket to add depth.
Semi sweet and Salted caramel are also used on your lower lash line.
7. Apply liquid liner to your upper lash & apply your gold pencil to your waterline.
8. Apply your false lashes and then apply a little of your favourite mascara to bind the lashes to your false ones.
9. For your lips, line them first and then slowly apply your liquid lipstick. If you don't have a lipstick this shade, pick up a creamy brown kohl eye pencil and this will work a treat too!

So there you have it my loves, that's it, how to do your own Kylie Jenner inspired makeup.
 I know that I used a lot of expensive items, so if you want to know a cheaper alternative of something I used, don't be afraid to ask!

I hope you all have a lovely week & enjoyed this post!

With Love From,

Rebekah x ♡


SHARE:

Friday 9 October 2015

My budget friendly skincare regime ♡

Hello my loves,

A question that I ALWAYS get asked by people is what do I do to keep my skin clear and in good condition. I'm actually ridiculously flattered when people say this to me because I suffered very badly with my skin for maybe 4 years on and off - and even now I have days where I hate my skin!

Here's a little background on my skin: 
As a 13-17 year old I used to get really unsightly little bumps all over my whole face; mainly my forehead, and they were so bad they used to have to be treated by prescription tablets. That was the only way that I could get rid of them. With these tablets however, I developed a sun/uva/uvb allergy and then every time I would go out in the sunlight I would get a horrible rash again that would have to cured by more topical creams etc. I had a BAD time and I had bad skin. After 2 years with a dermatologist and trying every cream you could think of, I started to get a course of medical microdermabrasion and that was actually what cured my skin issues in the end. It is a skin treatment that I would recommend to everyone who is suffering with their skin in a way that cleansers/exfoliants/toners are not fixing.

So now that I have my skin in a some what stable condition, my skin care regime basically deals with maintaining my skin and keeping it problem free. I use budget/chemist/drugstore products for my skincare - I've tried all the expensive brands too, but the ones that I'm going to talk about now are the ones that I have seen the best results with even in comparison with higher end brands. 
The only high end product that I use is the Glamglow 'supermud' face mask which I will talk about below. 


*Before we start I want to mention that while these products work for me - they may not necessarily be the best for you, every single person's skin is different. I have normal/sensitive skin that can be prone to dehydration so please use this as a guide!*

Morning: 

|PRODUCTS|

- Ultra pure rose water & witch hazel toner.
- Good Things Manuka Honey daily moisturiser.


I'm pretty simple in the morning.
I don't like to scrub or rub my skin because as I have sensitive skin, any harsh motion will leave my skin red & blotchy and I don't need that before I have to go to work!
  • As a cleanser for my face I will splash with cold water & then I will use my toner to give my skin a little quick clean and freshen it up. The rosewater in this toner will calm any irritations or spots you may see appearing and the witch hazel will fight them.
  • I then use my Manuka honey moisturiser, which smells divine and is light enough but still keeps my skin moisturized against air-con etc. 


Night:

|PRODUCTS|

- Eye make-up remover (I'm not fussy about this, I use any Nivea ones)
- The Body Shop Vitamin E cream cleanser
- Ultra pure rose water & witch hazel toner
- Good Things Manuka  Honey Daily moisturiser.

So my night time regime isn't extremely fancy either. 
  • I will always start by taking off my eye makeup so it doesn't go on to my face and I end up scrubbing my skin to get it off. 
  • Then I will double cleanse with my Body Shop Vitamin E cleanser. I can some times be guilty of wearing a lot of makeup and setting it so it doesn't move, ever - so I like to cleanse twice. First I'll massage the cleanser on to my skin and using a cotton pad remove the makeup. Then I will squeeze some more of the product on to 2 more clean cotton pads and using circular motions I will go all over my face till there is no makeup left.
  • I use my toner again next and this really helps to close the pores and stops dirt and bacteria getting in to any areas it also helps to heal any existing blemishes. I apply my moisturiser then again.


Special Products (2 or 3 times a week)

|PRODUCTS|

- Lacura 'Caviar Illumination 3 minute mask'
- Nip+Fab Glycolic instant fix mask
(I switch it up with these, I don't use all three of these three times a week)

- Nip+Fab Glycolic scrub fix
- Facial Brush (Penneys/Primark do a cheap one too)
- T.C.P
I love face scrubs and anything microdermabrasion is music to my ears and that's exactly what the Nip+Fab scrub is. It really helps to lift any dead skin cells and leave your skin feeling super soft. 

  • After I cleanse my skin in my night time regime, I will do a gentle scrub on my face 3 times a week roughly. Sometimes for a little extra once a week, I will take my facial brush and further rub the product into the skin with little circular movements.I find that this step really helps to keep my skin both clear and soft.
  • After I scrub my face and I've gotten rid of that top layer of old skin, I always use a mask. After you exfoliate is the prime time to reap the benefits of whatever mask you use. The pores are opened and the skin is prepped to accept product. I alternate between masks. The Nip+Fab Glycolic instant fix mask IS my favourite (I mean if it's good enough for Kylie Jenner..) but I do use Glamglow when my skin is being very bold.  
  • What I want to say regarding Glamglow is that it is a MUD MASK, the job of a mud mask is to draw out impurities. Therefore I know that some people will actually notice their skin is worse after mud masks. This is only because the mask has drawn out the impurities and they should disappear quickly. If you keep on top of mud masks they should prevent you from ever having that impurity build up and you will have no issues after using them after a few times!
  • A new face mask I actually picked up was by Lacura in Aldi! It is a caviar illuminating face mask & so far I am impressed! It cost me €8.99 and it is supposed to be a very good dupe for a La Prairie cream!
  • As I mentioned above I can get very dehydrated skin, so along with drinking lots of water, I like to apply an Argan facial oil to my skin once a week. This keeps your skin soft, supple and free of dryness.
  • If I do get spots, I actually don't use any of the so called 'spot treatments' I use diluted T.C.P solution. A spot is a form of bacteria so I think the best way to treat that is with an antibacterial. Ye,s this stuff stinks and that is why I will only use it at night, but I promise you it is the best thing for clearing your spots ASAP. I swear by it. 


Okay guys so there you have it. This is my skincare regime. It's nothing fancy but I do have little tips and maybe some of the products that I love could work amazing for some of you too!
Let me know below if you'd like more information on any product, or even if you've used any of these products let me know how they've worked for you!

With Love from,

Rebekah x♡


SHARE:

Tuesday 6 October 2015

5 minute Autumn smoky look♡

Hello my loves,

So, I'm back with another makeup look.
 I really love and enjoy doing these and sharing my tips and favourite products with everyone.
This time, I wanted to just do something to show you that you do not have to spend hours doing your makeup to get a very good, professional result.

 This is the super simple look that I am going to talk you through step by step to achieve:


Basically, what it is, is a warm reddy brown smoky eye, with a super dark purple lip and I'll show you how it takes literally 5 minutes. So let's go!

|FACE|

- Barry M Flawless brightening primer
- Charlotte Tilbury Magic Foundation (shade 2)
- Urban Decay Naked concealer (light warm)
- Seventeen bronzing cream

1. So I first smooth some primer on to my skin. I chose this brightening one by Barry M because in the morning my skin can look super tired and grey for want of a better word. This primer is actually only new to the market and I picked it up in Boots & to be honest I've been using it ritually since I bought it!
2. Blend on your foundation and pop some concealer under your eyes for a brightening effect. I chose the Charlotte Tilbury foundation because I wanted something with full coverage which meant I didn't have to waste time building up layers.
3. I didn't do any crazy contour, I literally just want to warm up my face so I added my Seventeen bronzing cream and ran it around my hair line and into the hollows of cheek for a really natural, easy contour.

|EYES|

- Anastasia Beverly Hills dip-brow pomade (In ebony)
- Mememe cosmetics baked eyeshadow quad in 'Opulent eyes'
- Rimmel Super curler mascara


4. I filled in the sparse areas of my brows using my dip-brow. I find this product is the best brow product on the market.
5. Using the Mememe palette wet your brush and dip into the shade to the left of the burgundy colour (i can't describe the shade but it's a warm red brown I think) a pat this on to your lid and run it on your low lash line too.
6. Take a clean blending brush and gently buff out the harsh lines by placing the brush into your crease and swiping back and forth a few times.
7.  Add your favourite mascara, and you're done!

|LIPS|

- Penneys purple/wine lip liner (it actually has no shade name..)
- Inglot Black swan Matte lipstick collection #435

8. Line your lips with the lip liner to stop the dark shade bleeding on to your face, I really recommend that you don't skip this step when wearing dark lip.
9.  Apply your lipstick on top.

Finito!
 That's it, it's that simple. There is no crazy 10 eye shadows or anything like that, It's quick and simple and I do this kind of look before work in no time - I do this look in a shopping center bathroom in the mornings so I am emphasizing how quick this is! 

The Mememe cosmetics eyeshadow quad is one of the best drugstore/chemist quality shadows I've ever tried. You can mix all the shades and create a few looks and the pigmentation is just amazing. I'm delighted that I picked this up - if you've been coveting the Mac 'Burgundy Times Nine' palette, while this isn't  identical - it's a good substitute and covers you with them burgundy tones.

I hope that you all have a lovely week and if you do try this look, do hashtag #rebekahwithlove because I would absolutely ADORE to see someone trying this look:)
Until next time!

With love from,

Rebekah x♡


SHARE:
© Rebekah with Love

This site uses cookies from Google to deliver its services - Click here for information.

Blogger Template Created by pipdig